Showing posts with label recipes. Show all posts

Sep 11, 2014

Le Chicken Salad

Because I had leftover chicken.

Because my clan is not great about leftover chicken.

Because I cannot bear to throw anything out.

May I present...


Chicken Salad

What you need:
 - chicken (I use leftover grilled chicken, rotisserie... but feel free to make it fresh too!)
 - celery stalks, finely diced
 - red onion, finely diced
 - cashews, roughly chopped
 - low fat mayo
 - paprika
 - garlic salt

What you do:

I realize I have not given any measurements above. The reason is, as I have said in recipes before, this is about what you like and how much you want to put in. Got enough chicken to feed a small army? Make enough for a few days for a family. Only a little? You got lunch for one :)

Put all the ingredients in a large bowl.

Don't be like me. LARGE bowl, so you can actually mix without things escaping!


And then you know what you can do with this?...

This...


Happy Eating!
:)

.

Sep 4, 2014

Fish... just fish

I do not like seafood.

That is all.

Goodbye.

...seriously though, I am not a fan of seafood in general but I will eat fish once in a while. I know how healthy it is for you, yes, I heard that one already. I just can't always handle that fish smell or taste. So... I do what anyone else would do... I bring on the spices!

This is far too easy to make to be called a recipe :)


Fish in the Oven

What you need:
 - fish! I used sole, but I think this would work well with any fish.
 - Canola oil (or whatever oil you have and prefer)
 - salt
 - pepper
 - thyme
 - paprika
 - garlic powder
 - fried basil

What you do:

Preheat the oven to 400 F.
Wash the fish and make sure there are no bones in it please... you don't want to gag on this deliciousness!
Pat the fish dry and place on parchment paper on a baking sheet.
Drizzle with oil and sprinkle with the rest of the ingredients. I don't use exact measurements here, and neither should you (ok, other than the salt.. easy on that... you can always add more!). This recipe lends itself well to whatever rings your bell as far as flavor. You like more herbs, add 'em. Less paprika... no problemo.
Then turn the fish over and do it all over again.


Pop in the oven for 20 minutes or so. I have an antiquated tiny oven so it does it thing quite quickly. They are ready when they look somewhat like this or when you can flake a piece away easily with a fork.


Some people like to add some fresh lemon juice before it hits the oven. Do it!
Some like to add lemon juice before eating. Do it!
Either way, the lemon juice it optional, but it does go hand in hand with fish :)

This was so tasty... really! I would have left it in the oven even a little longer. I like it more browned and a little crispy on the edges. Serve this with some mashed potatoes and peas.... please.


Happy Eating!
:)

Aug 28, 2014

One Pot Ratatouille

No big secret... I am not a salad lover.
Makes me feel like a goat. Just sittin'... aaand chewin'... and chewin' some more.
And yes, I could douse the mix in salad dressing, but doesn't that defeat the purpose?!

I do, however, love vegetables. Sauteed, roasted, broiled, bbq'd, steamed, boiled, and so on... fried too of course. But then again, you could fry a boot and I would eat it ;) lol

So, here then, is my mom's recipe for an all-in-one-pot ratatouille. What I love about this one is how flexible the recipe can be. She would always add a potato to it. I found some cabbage in the fridge and decided to add that before it found its way into the garbage. Sweet potatoes, mushrooms and any other kinds of veggies you love work really well here. You can also add more of one vegetable than another if you prefer. It's all good, man!


One Pot Ratatouille

What you need:
 - 2 tbsp (or less) canola or olive oil
 - onion, peeled and diced
 - 4-5 carrots, peeled and diced
 - 4 -5 celery stalks, cleaned and diced
 - 3 medium zucchinis, diced
 - 1 tomato, diced
 - 4-5 garlic cloves, finely chopped
 - 1/2 a small head of cabbage, roughly shredded
 - 3/4 cup of your favorite pasta or marinara sauce
 - 1/2 tsp thyme
 - 1/2 tsp basil
 - salt & pepper to taste

What you do:
Get yer pot out and put over a medium heat. Add the oil, onions, carrots and celery and let them saute together for about 10 minutes. Keep your eye on them and stir them around while you chop up the rest of the ingredients.


Rule of thumb here (and just basic fyi for cooking like this), always add the harder ingredients to the pot first. They need more time to cook through. For example: carrots take longer to cook than zucchini.
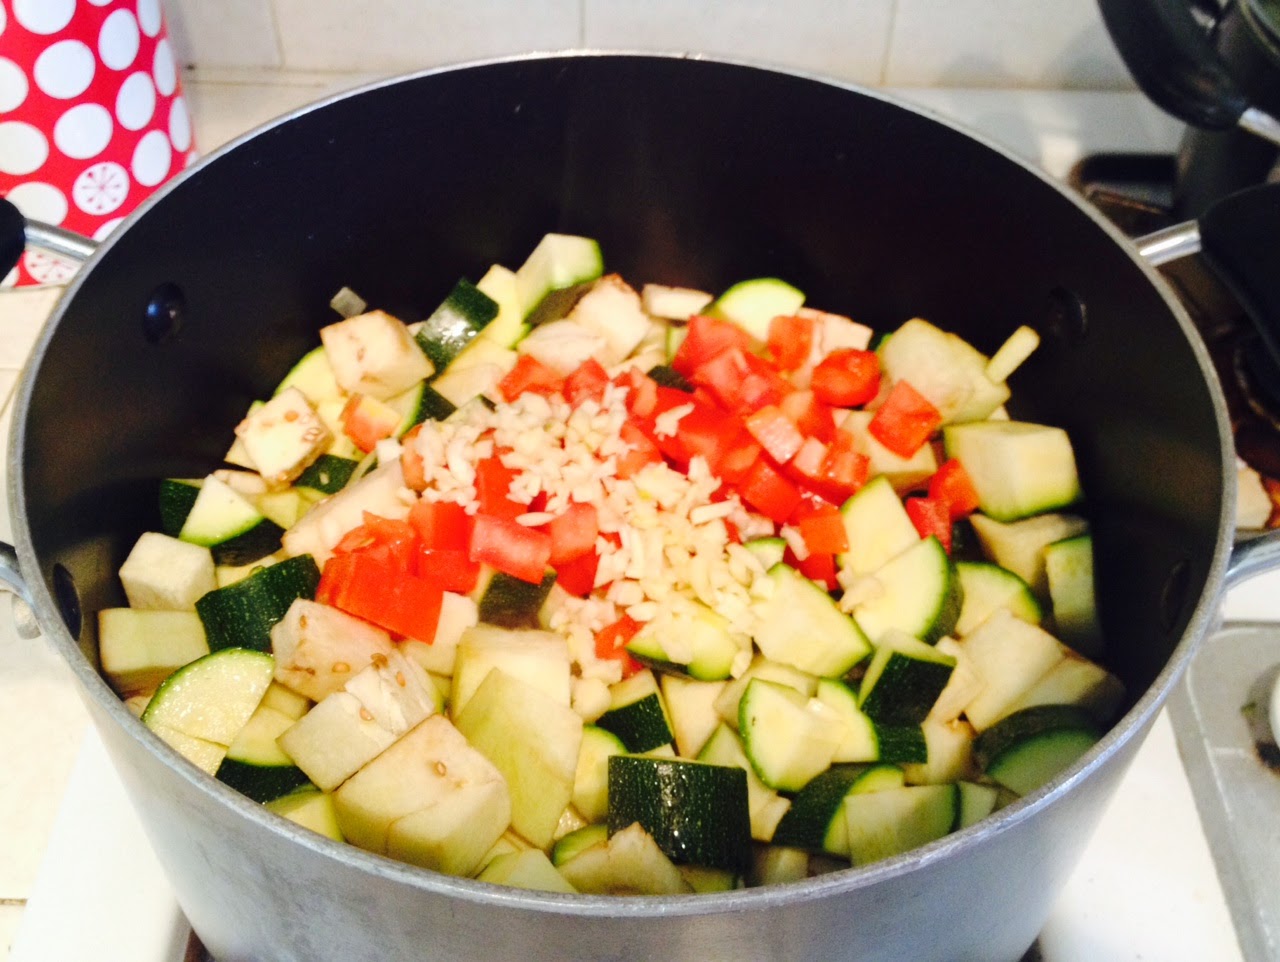
So, now would be a good time to add the eggplant and zucchini...


...followed by the tomato and garlic.


Give them a stir, cover the pot and put the flame on low.


After about 5 minutes, add the cabbage. I would have added it before, but that's how long it took me to get it chopped up and the 3 year old off the kitchen table.


Let that cook for another 10 minutes or so to get most of the veggies translucent and relaxed enough to release some flavor into the mix ;)
Then it's time to add the pasta sauce, salt, pepper and herbs.
Do you say 'erbs or Herbs?
I am a HHHerb person myself.
:)

Now it's time to give it a stir, tuck everyone in and let the good stuff cook! I left this for almost an hour, checking and stirring every once in a great while (read: when I actually remembered). It really depends on how you like your vegetables. With some bite left? Mushy mushy? You decide...
No need to add any water either, most of the veggies already have lots of water which will come out as they cook.


Ta-daa... dinner is served...
This was dinner on night #1. Lunch on day #2 with some tater tots and dinos... yeah, yeah... and dinner again on night #3 with brown rice and a burger patty! Still one more serving to go.
My phone app tells me this is worth about 133 calories a pop! Not bad for a bowl full of SEVEN veggies!
I think I will eat that last serving on some Ak-Mak crackers.

Oh... and bonus points: it is delicious hot and cold!


Happy Eating!
:)


Aug 9, 2014

Menu Planning (Version 1)


OK... I have a couple of different ways I do our menu planning. And oh yes!... I DO do menu planning.

(*snort*... I said do-do)
Sorry, I will stop being 6 years old now.

I started the original version years ago and slowly evolved it to something simple to set up and maintain. I was so tired of seeing food go to waste. I would literally be throwing dollars down the drain and bags of cash into the garbage bin. And somehow still, I would manage to stand in front of the fridge in the evenings and utter that same old phrase... 'there's nothing to eat'!

Before summer began I knew I had to make a revision to my menu planning. Not that it wasn't working. It was. But in the spirit of letting my kids pick their activities, I thought I would involve them in picking out how the menu would look for each week.

Before anyone has a full on melt down about giving kids the freedom to choose mac 'n cheese for dinner every night... please read on :)

Today I am showing the revised version - my summer version of menu planning.

Step 1: Ye Good Ol' Paper & Pencil!


For this stage I only focus on what's for dinner. I know I have to make dinner 7 times a week (although Saturday and Sunday meals are interchangeable with lunchtime too... more to come on that later). So I list 7 main ideas I can use for dinner. In case you cannot read the chicken scratch above, our main choices are:
 - Chicken
 - Chicken Salads
 - Ground Meat (usually turkey)
 - Beef
 - Fish
 - Vegetarian
 - Light Dinner
After that is decided I then think about what my week looks like and start allocating a day to each main item. For example: I know that on Tuesdays and Thursdays our days are packed so I chose ground turkey for Tuesdays because I know I can make it in the morning and have it ready for dinner later and Thursdays is a light dinner. Round this household, that means we make some whole wheat toast and bring out an array of healthy 'toppings', like sliced cucumbers and tomatoes, olives, hard boiled eggs, cottage cheese, fresh mozzarella cheese, etc. It gives us a break from heavy foods (and mama a break from cooking!) and helps us eat light.


Step 2: Ideas!


Now that we have what we want to eat and when we want to eat it, the next part is the fun part!
The first thing to decide is how long you want this menu to last.
I knew that summer was about 10 weeks and I also knew I would have zero time to menu plan when the kids were home with me, so I decided to go ahead and make a 10 week menu plan.
This plan works for 2 weeks or 20 weeks. It's so simple!

I began with listing my menu item for each day. So I would put down 'Fish' as my header with 10 lines under it (one line per week for my 10 week plan). Then I came up with 10 ideas using fish that I knew my family would enjoy. Sometimes I stick to the favorites, but now and then I will throw in something new to try. Same with each of the other daily ideas. That way if I screw up royally on a dish I can say, 'Oh well, at least next week it's back to fish sticks!'... lol

Once that is done I made a little sketch of the week and added a column for lunches (grr... no need to pack lunches during summer break but those mouths still need to be fed come noon!)


As you can see above, I keep Saturday and Sunday 'dinners' interchangeable with lunches on those days. We are sometimes out in the evening with the kids or my son's basketball game ends just at noon and we feel like grabbing lunch out.  I also have a 'Pantry Raid' (I said PANTRY!!) on the weekends. That's when the soups come out, or cereal, or frozen food, or sandwiches, or leftovers... get the idea? Mama doesn't want to cook, so help yo'selves!


Step 3: Bring It Together


I found some left over pink poster board, trimmed the side and made my little sketch above come to life on it. And by 'life' I mean I Sharpie'd it on! ;) I knew I would be using business card sized cards for the menu items, so I sized the spaces accordingly.


Then this baby went up on the side of the fridge. I made little pockets (cause I was too lazy to go out and find tiny envelopes) with some yellow card stock and stuck them next to the menu plan. These little pockets hold the business cards. The business cards each have the ideas I wrote down earlier for each meal item. I printed them out on the cards. Cause. I. Am. Anal. Like. That.


Step 4: Ready To Use!


That's It! The menu plan is ready!
Every Saturday or Sunday my husband and the kids reach into an envelope and pull out something they want to eat that week. Then use some tape to stick it on to the matching space on the board.


Once they have put their choices up I go through and add a veggie to go with that dish (the green sticky notes) and if needed some kind of carb to go with the dish as well (the orange sticky notes). That way I know it is a complete meal. 

(The blue sticky notes are for the days we have basketball practice and the pink is for my daughter's gymnastics class. The yellow sticky notes on the right side are quick breakfast ideas for the week.)

This menu plan has made life so much easier and saved us so much money. No more 'what's for dinner?' whining at 7pm and no more throwing out veggies and meat that looked so good in the store and you just knew you would end up making something delicious with them but never actually got around to finding it because it was buried under the old broccoli in the drawer (true story!... hahaha). Now, everything I buy... I USE! Shopping is super easy too since I just go off of what's on the menu for that week.
I bring out my recipe book if I need to look up a list of ingredients for a dish so that I am not guessing on the same day what I need.


**The beauty of this system is that they feel like they are in charge of the menu, but in reality I have already chosen the item I feel like making. In my case, I kept summer quick and easy without too many new recipes and hours of cooking**


 --I have since revised this version with changes to lunch ideas and more healthy choices--
 --I will post those changes soon--


Jul 25, 2014

Busy Hands: Homemade Lollipops

These were so quick to put together and make.
The kids loved that they had just made their own candy!

Homemade Lollipops!

What you need:
 - Jolly Ranchers hard candies, unwrapped
 - mason jar lids or cookie cutter shapes
 - lollipop sticks
 - cooking spray (for goodness sake, please don't use olive oil or some such flavor, your kids will never forgive you!)
 - parchment lined baking/cookie sheet


Yesterday the kids were out in the pool since it was almost 100 degrees out and that was the only sane place to be, so I brought the necessities out to them and let them build their own before taking it in to bake.
My son had a friend over, hence the 4th lid... and mommy wanted to try make one too! Duh!
I sprayed the baking sheet lightly with the cooking spray as well as the inside of the lids.
Do. This. Step!


This is what they looked like after baking in a 350F oven for less than 10 minutes. I kept my eye on them (and the kids in the pool!) the whole time. Even though the lids were flat on the baking sheet, these little suckers still 'bleed' all over the place if they feel like it, so don't get your heart too set on whatever shape you have used.


I immediately used one of the lollipop sticks to swirl the colors together. In all honesty, these could have used another minute or two in the oven. They were still a little thick as I was trying to swirl them around.
Oh, and they harden VERY quickly!

Next, it's time to remove the lids. You want to do this as soon as possible so that it doesn't harden with the candy. My tool of choice: nearby scissors. Yehhhhs... they were clean! This looked pretty cool too. Keep scrolling down to see the artwork that came from this step ;)


Then I swirled the lollipop sticks into one side of the candy. It was already hardening, but still warm enough to get the stick in.
SO COOL!
Yes, I'm shouting! I get super-excited when something actually works the way I wanted it to! heeeeeeheee


I let them cool in the fridge until after dinner and before basketball. Ha, you see what I did there?... sugar AFTER dinner but BEFORE burning it all off at practice. Anyway, they only managed to eat a quarter of it before it was stored in plastic bags for the next day.
Sneaky mama!


Now... check this out!....
These are scraps of hardened candy I had after cleaning up. 
'aint it pretty?!


And this is what I was referring to earlier... the lid of pulled candy.
I want to live in here!


His lollipop...


'Mommy, mommy... take a photo of mine too please!'


Happy Creating!
:)


Thanks to http://www.playathomemomllc.com for the great idea!

Sweet Potatoes this way

I never liked sweet potatoes.

I still don't.

Unless, of course, they are prepared like this...

Oven Roasted Sweet Potatoes

What you need:
 - sweet potatoes, peeled and diced evenly
 - carrots, peeled and sliced
 - onion, peeled and roughly chopped
 - salt & pepper
 - 2 tbsp. oil
 - garlic powder*
 - dried basil*
 - turmeric*
 - paprika*

What you do:
Preheat the oven to 425 F.
Mix all the ingredients in a large bowl until well combined. Transfer to a baking dish and spread evenly.


Bake for about an hour. You will have to stick a fork in a couple pieces to see if they are tender enough for your liking. I also have a seriously old-ass oven and it takes faaa-evah for something to roast in there.

I could eat this every day. Every. Day.
This is what it looked like on my dinner plate that night...


Let me know what you think!
:)

*I really just eyeball these amounts. Everyone has different preferences, but if I had to give an educated guess, I would say I put 1/3 tsp of each. Turmeric and paprika can become a little bitter if you use to much, so start with a little at first. 
That wasn't a very big help was it?!
lol